The purpose of this page is to familiarize you with the planes, sequences, and protocols used in cardiac MR. Sequence descriptions are kept to a minimum here and are discussed in one of the recommended readings. This page focuses instead on obtaining the proper imaging planes for performing a cardiac MR exam. Once you know how to get the planes you can put them together to form actual cardiac MRI protocols. To scroll though multi plane stacks (images with borders), click on the image and use the "<" and ">" keys.
CMR Sequences
CMR Planes
-
3 Chamber View (3CH) aka Left Ventricular Outflow Tract (LVOT)
-
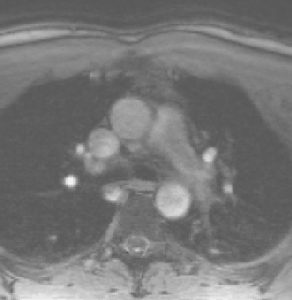
Short Axis Stack for T2 FS, T2 mapping, T1 mapping, and Perfusion
Basic CMR Protocols
Dark blood images null the signal from blood using the double inversion recovery (DIR) technique, which is not discussed further here. DIR sequences can be fast spin echo, in which case each image is acquired in a separate breath hold, or single shot, in which case multiple images are acquired in one breath hold. DIR images are always gated to the EKG so that cardiac motion is removed from the images. These sequences are used to determine anatomy.
Bright blood technique is either a balanced steady state (TRUE FISP or FIESTA) or a more conventional gradient echo (GRE) sequence. TRUE FISP is faster and has better signal to noise and contrast to noise ratios, but is more susceptible to metal artifact and magnetic field inhomogenieties. This is the sequence we use most often to watch the heart beat. GRE is more sensitive for detecting turbulent jets but has lower contrast and the images take longer to acquire. You might use GRE if you are looking to see the subtle jet of an ASD or VSD. Both techniques are gated to the EKG to produce movies of the beating heart. Generally, 1 slice is obtained per breath hold. These images are used to assess cardiac function by watching the heart beat.
Fast spin echo sequence is a double inversion recovery STIR Edema and fluid are bright. This is used to look for myocardial edema from myocarditis or active inflammatory disease. The images are gated to the EKG. Generally, one image is obtained per breath hold. Since this is a STIR the sequence is run pre-contrast.
Delayed Myocaridal Enhancement (MDE)
Post contrast sequence used to evaluate for myocardial scar. Normal myocardium enhances and then washes out. Myocardial scar enhances late. An inversion recovery pulse is used to null the signal from normal myocardium and make the scar more conspicuous. The optimal inversion time (TI) is different for each patient and is determined by you and manually entered into the sequence to optimize results. MDE images are obtained 10-15 minutes after contrast injection to give the scar time to enhance.
This is a gradient echo sequence used to measure blood velocity. By integrating pixel velocities across a vessel volume flows can be calculated. Velocity measurements are used to estimate pressure gradients. Volume flows are used to calculate stroke volumes, estimate shunt fractions (by comparing pulmonary versus systemic flow), and for assessing the severity of valvular insufficiency (by measuring regurgitant fractions). You must estimate the maximum velocity of the blood in the vessel you are imaging prior to running the sequence.
-
Dark blood and bright blood images for anatomy. These are straight axial images.
-
We used to skip the dark blood b/c it was long at 1 breath hold per image which tired patients out at the beginning of the study. Now we use a double inversion recovery intermediate weighted single shot sequence, which gets the entire chest in two 15 second breath holds.
-
EKG gating is important for this sequence because it eliminates motion artifact. The bright blood sequence is 15 seconds if gated to the EKG but can be done in less than 5 without EKG gating. As long as one of these is done with breath hold and EKG gating you will have a good axial scout for future planning
-
Shows VLA of the left ventricle and also the left atrial appendage.
-
Single bright blood cine slice in a single breath hold.
-
Prescribed off the axial dark or bright blood series.
-
Place center of the plane on the center of the mitral valve (where the two leaflets meet). Rotate the plane so that it passes through the apex of the left ventricle. Scroll up and down on the axial scouts to ensure the plane passes through the apex of the ventricle on all slices. Check the plane on the true axial and sagittal scout images to ensure there will be no wrap if parallel imaging is used.


Right Vertical Long Axis (rVLA)
-
Shows a VLA of the RIGHT ventricle which includes inflow from the tricuspid valve and outflow through the right ventricular outflow tract (RVOT).
-
Single bright blood cine slice in a single breath hold.
-
Prescribed off the axial dark or bright blood series.
-
Place center of the plane on the center of the tricuspid valve . Rotate the plane so that it passes near to the RV apex. Check the plane on the true axial and sagittal scout images to ensure there will be no wrap if parallel imaging is used.


Right Ventricular Outflow Tract (RVOT)
-
Used to plan the pulmonary artery view for planning pulmonary artery phase contrast images. Used to look for RVOT obstruction in congential heart disease cases. Used to plan dedicated RV views for ARVC cases (not shown yet here).
-
Single bright blood cine in a breath hold
-
Plan off axial scout image. Place plane parallel to main pulmonary artery and scroll down to make sure it passes through the RVOT
-
Check the plane on the true axial and sagittal scout images to ensure there will be no wrap if parallel imaging is used.

RV = Right Ventricle, RVOT = Right Ventricular Outflow Tract, PA = Pulmonary Artery, LA = Left Atrium, A = Aorta
-
This is plane obtained for planning purposes.
-
Single bright blood cine slice in a single breath hold.
-
Prescribed off the VLA.
-
Place a plane perpendicular to the cavity of the left ventricle at the level of the papillary muscle.
-
Check the plane on the true axial and sagittal scout images to ensure there will be no wrap if parallel imaging is used.


-
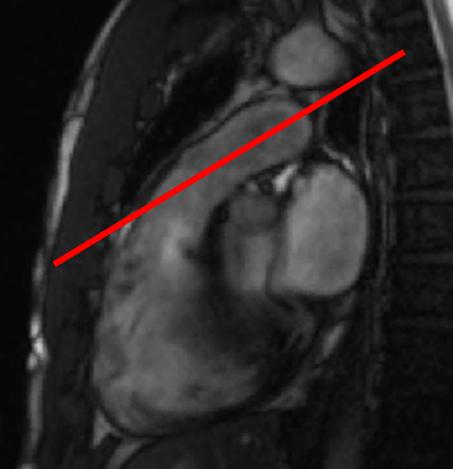
This is a scout image that will be used to plan the pulmonary artery phase contrast image.
-
Single bright blood cine in a breath hold
-
Plan off the RVOT view while the FSA cine sequence is running. Place the plane in the RVOT parallel to the PA.
-
Check the plane on the true axial and sagittal scout images to ensure there will be no wrap.

-
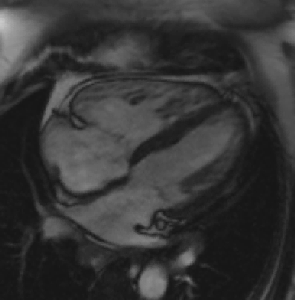
This is a plane through all four chambers including the mitral and tricuspid valves. It differs from the horizontal long axis (HLA) in that it is planned using both ventricles (see below) whereas the HLA is planned off the left ventricle only. In many patients, the 4CH and HLA are similar, but we use the 4CH because many of our patients have abnormal hearts and the HLA will not adequately image the RV and tricuspid valve.
-
Single bright blood cine slice in a single breath hold
-
Prescribed off the fake short axis
-
Place the center of the plane on the most angled portion of the right ventricular wall. Rotate the plane so that it passes through the anterior papillary muscle during diastole. Check on the VLA that the plane passes through the ventricular apex.
-
Check the plane on the true axial and sagittal scout images to ensure there will be no wrap if parallel imaging is used.

LA = Left Atrium, LV = Left Vetricle, RA = Right Atrium, RV = Right Ventricle, A = Aorta
-
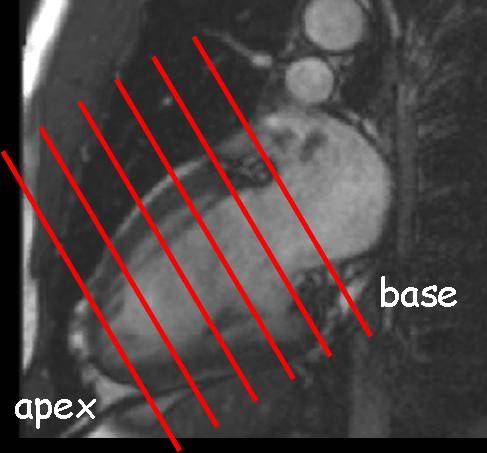
Images used to view the myocardium in cross section (except for the apex), measure volumes using Simpsons rule calculations (or “circles”), and assess for myocardial wall thickness and motion.
-
IMPORTANTEarly in the exam we acquire the SAS stack as non-cine images in one or two breatholds. We will use these non-cine images to plan the 3CH views. We obtain the cine SAS AFTER we give gadolinium.
-
Planned off the VLA and 4CH views. Place the planes so they are perpendicular to the LV on both the VLA and 4CH views. Try to make the planes parallel to the mitral and tricuspid valves.
-
Rotate the image plane using the FSA image to make sure the phase direction is across the most narrow part of the anatomy
-
Check the plane on the true axial and sagittal scout images to ensure there will be no wrap if parallel imaging is used.
-
For a viability or infiltrative disease study just include the ventricles. For a congenital heart disease case include the entire heart.

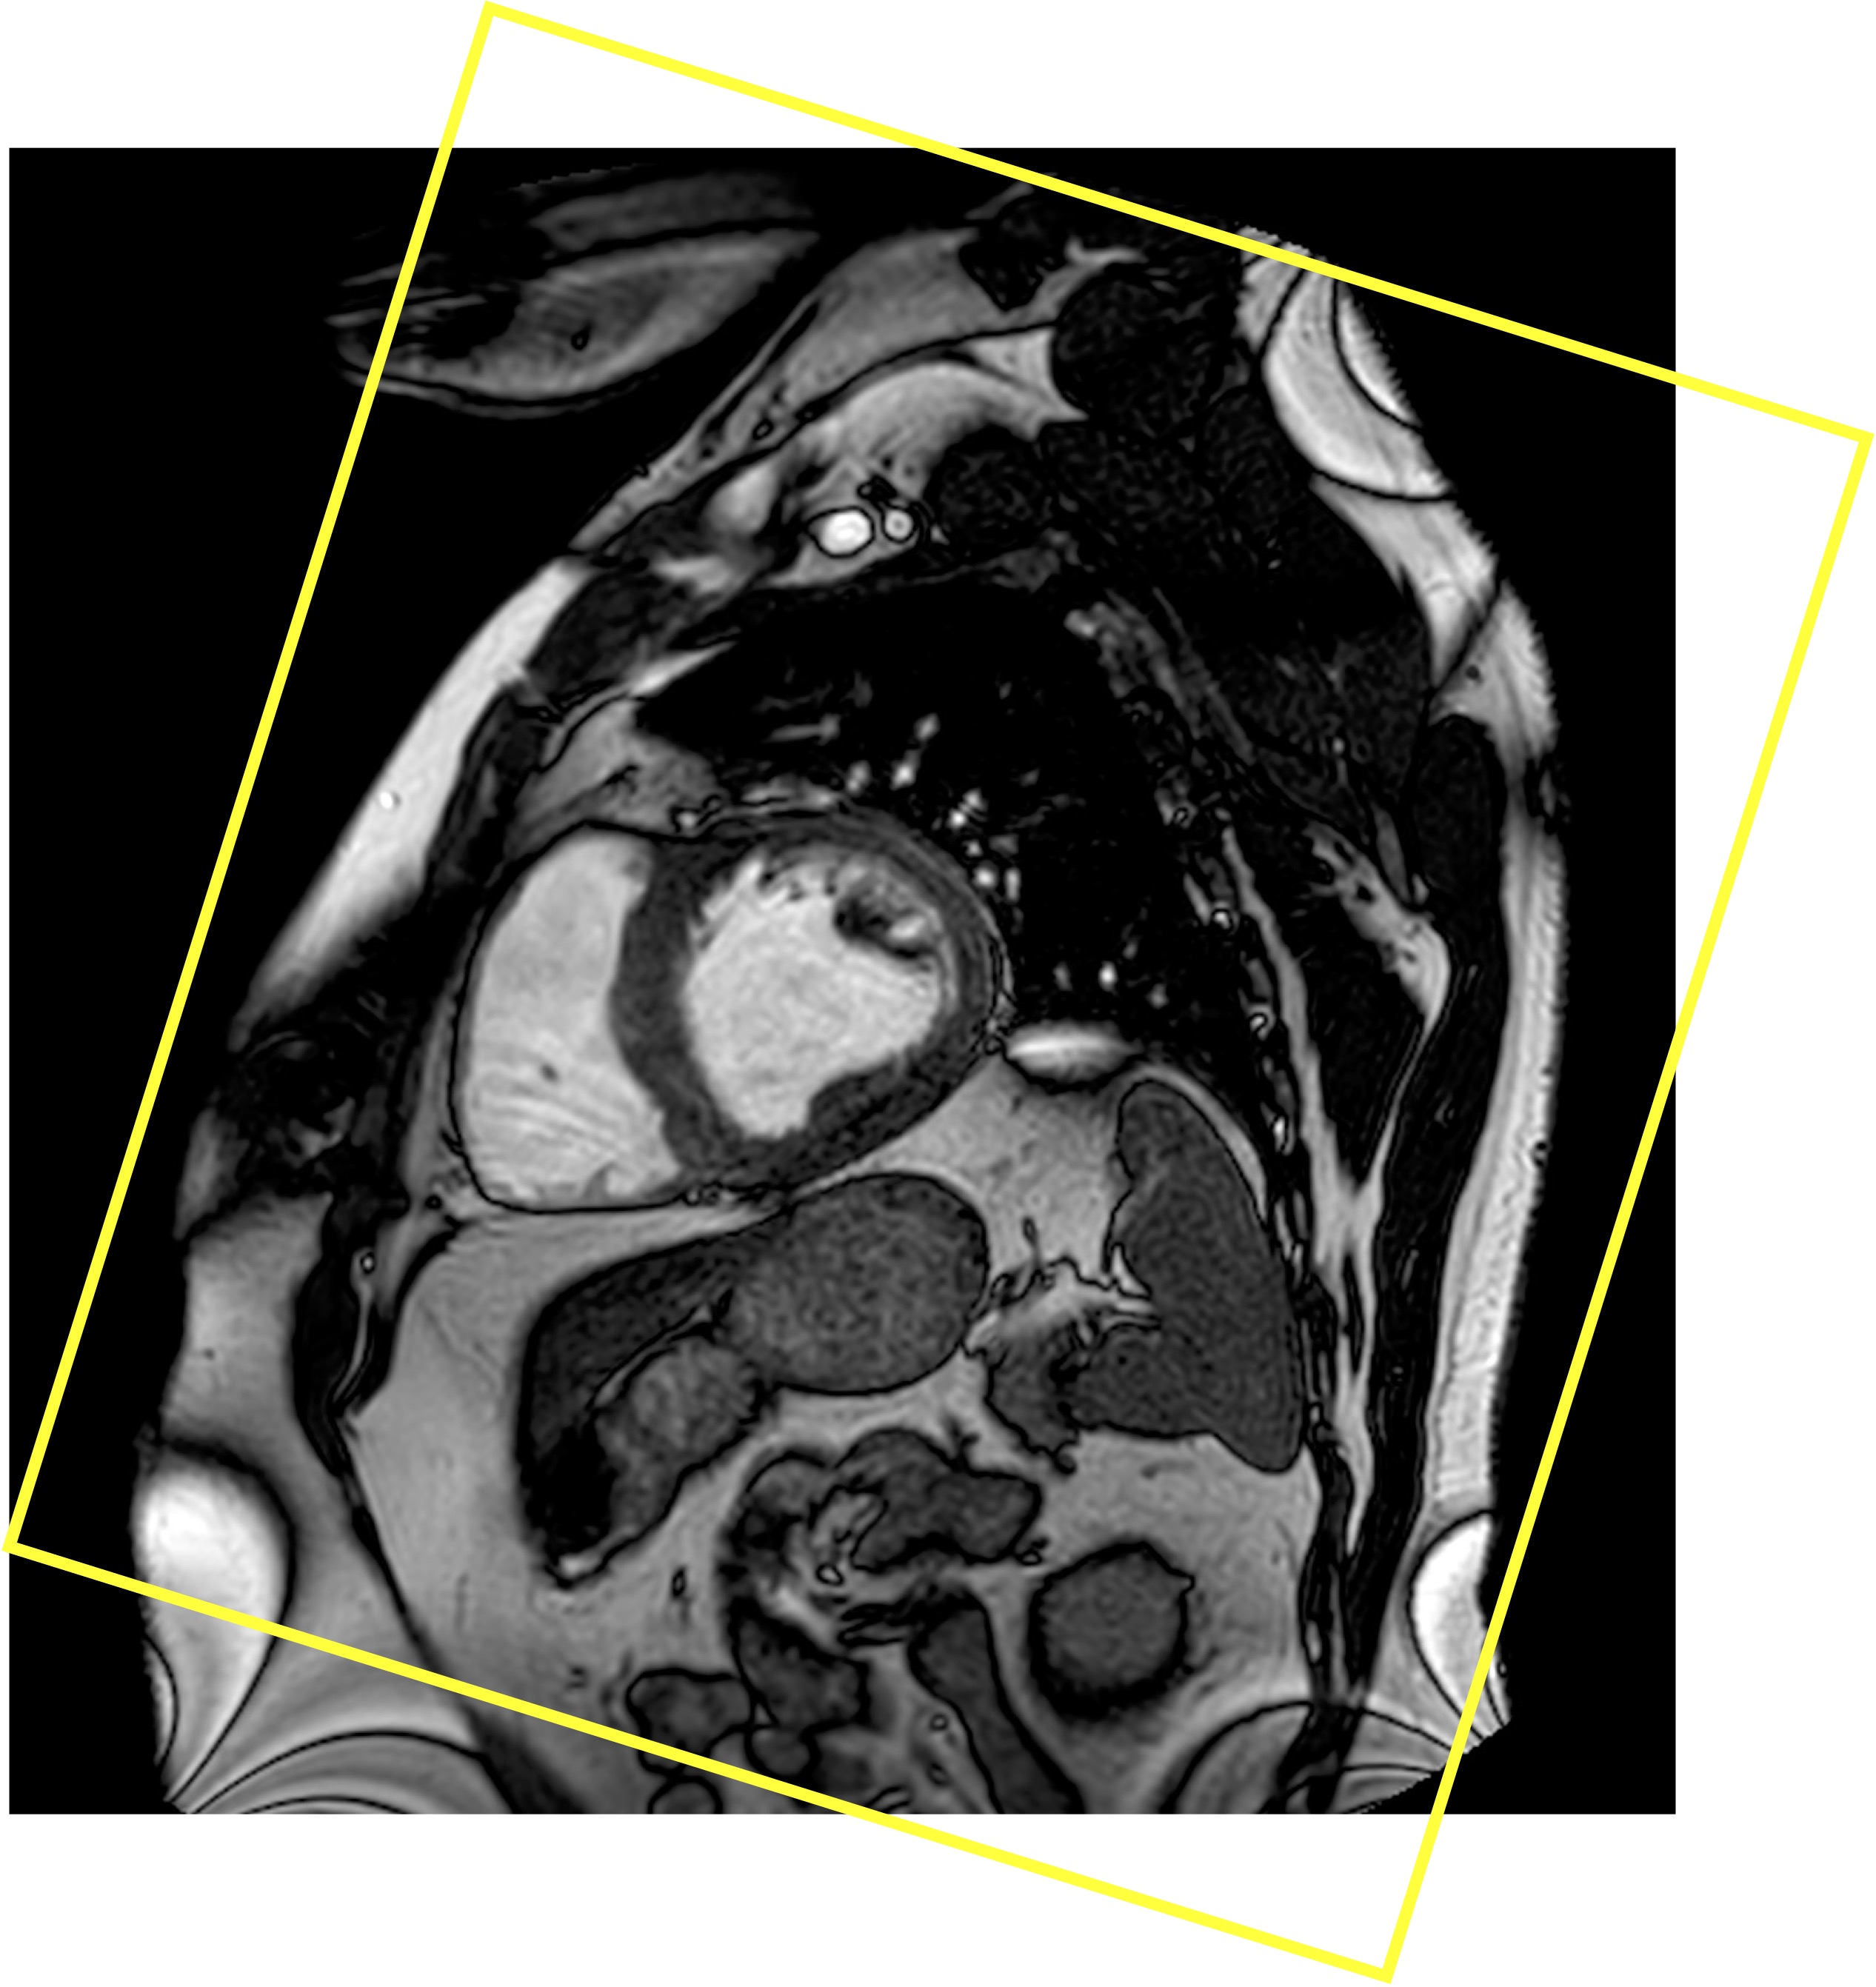
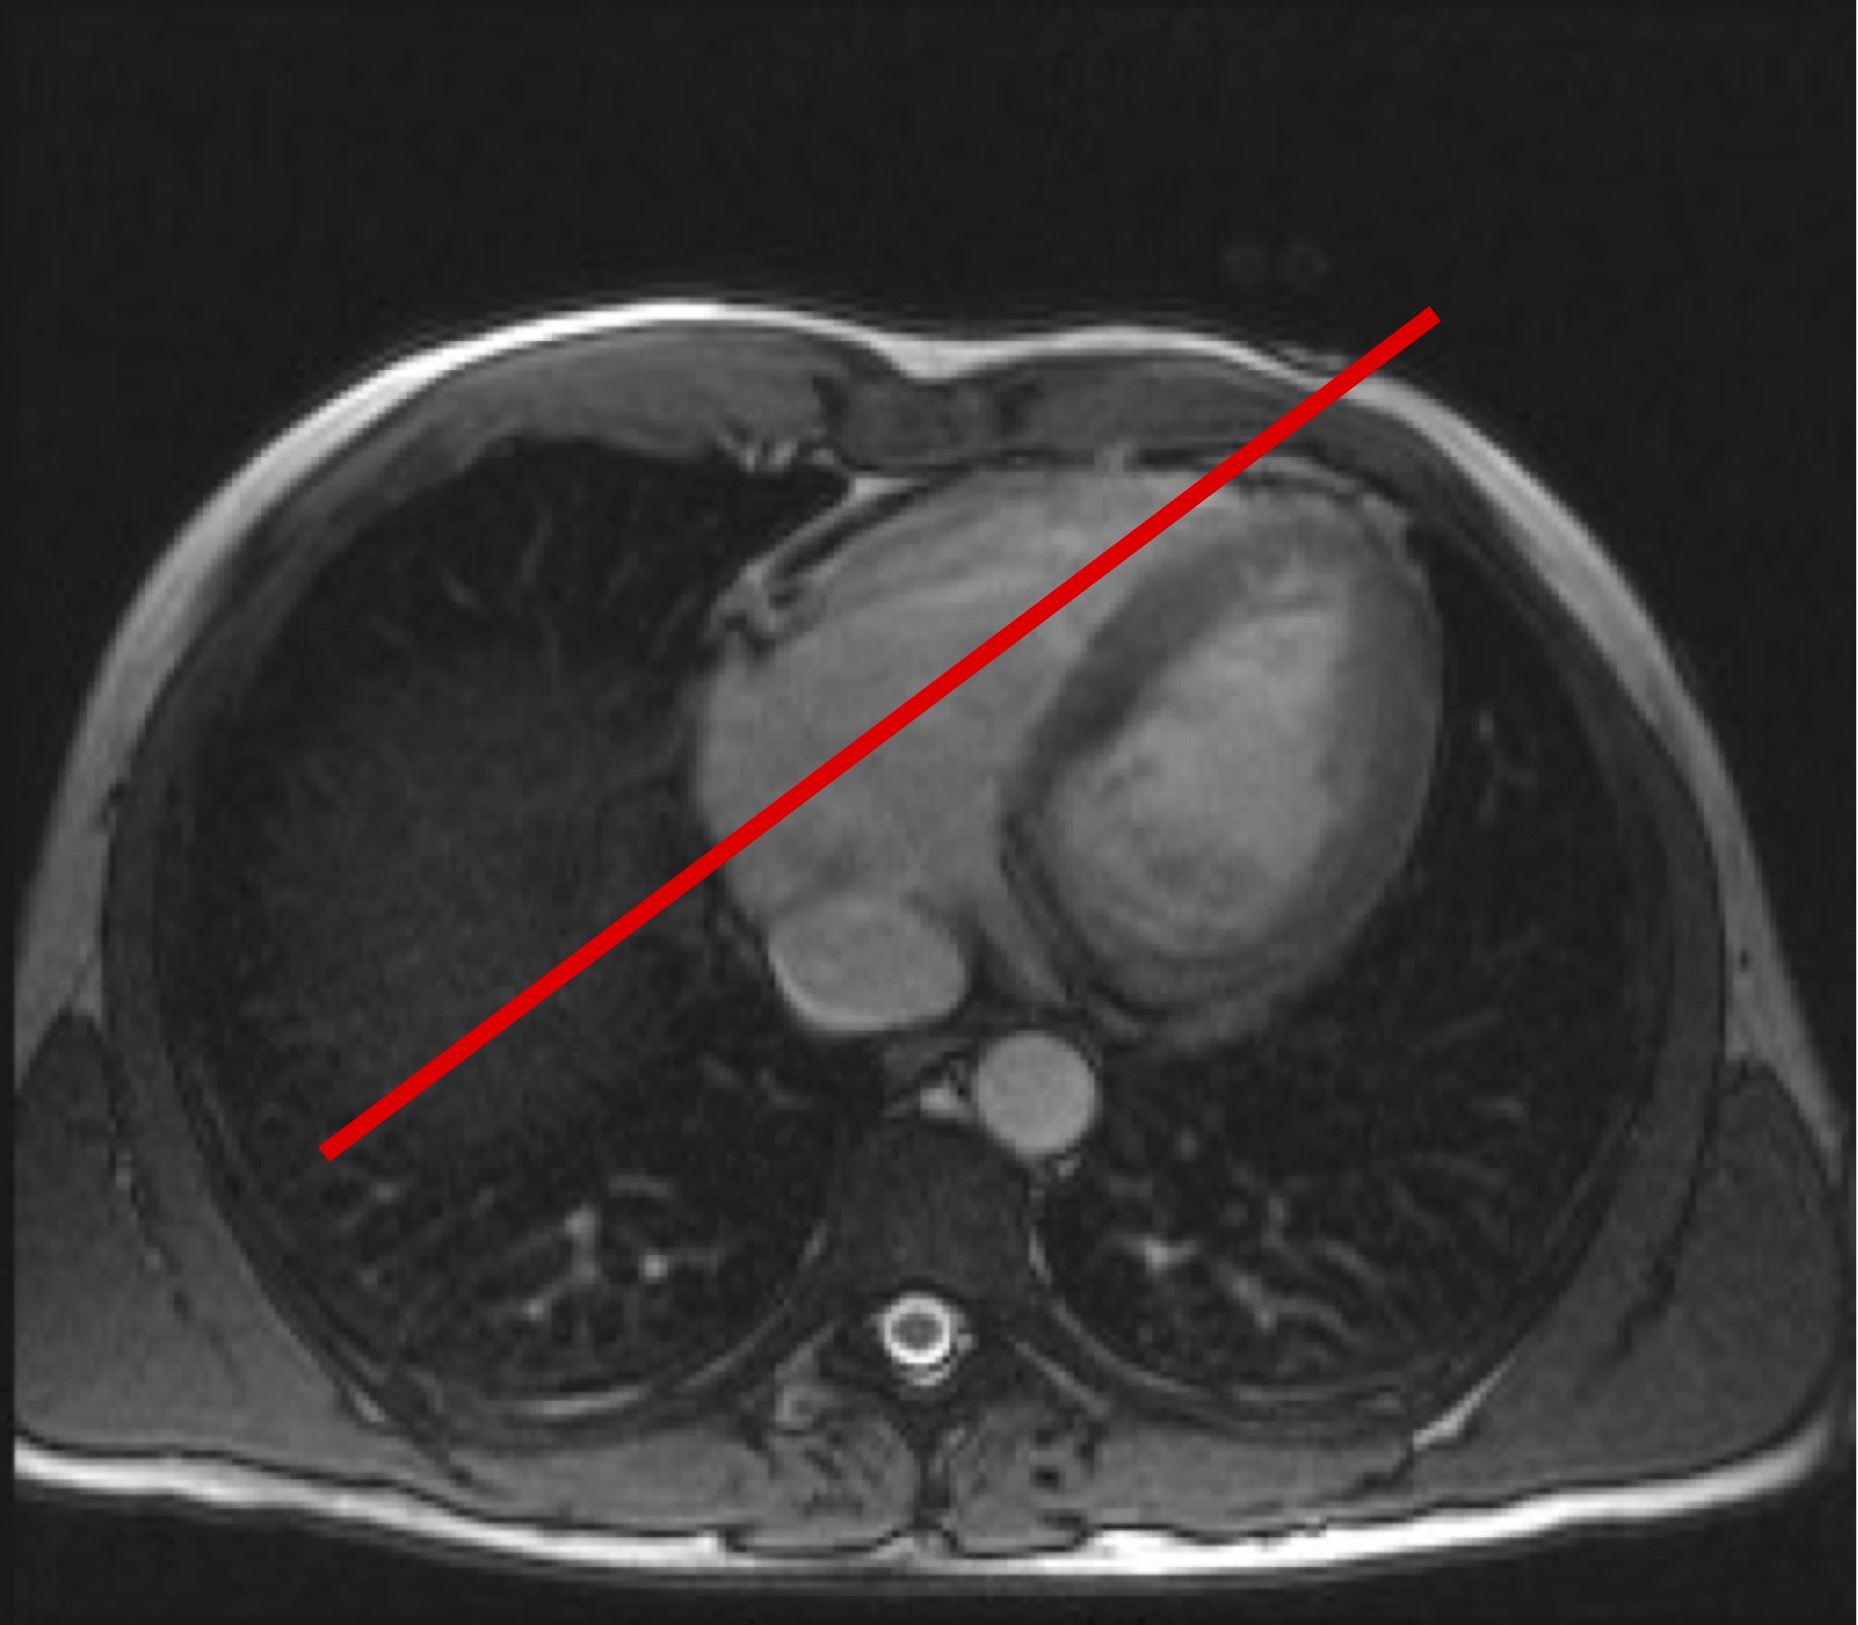
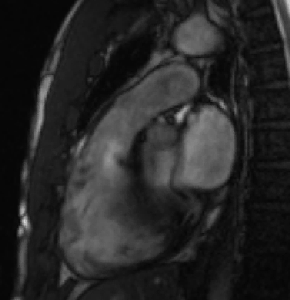
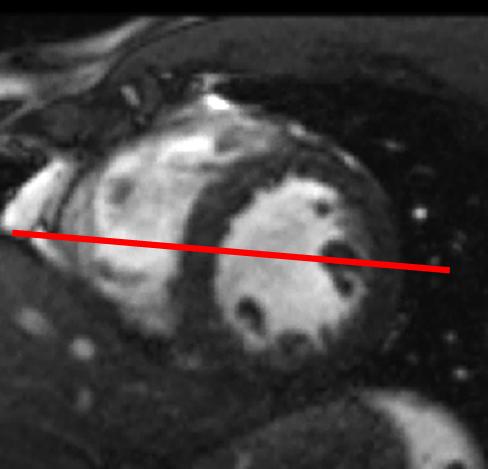
3 Chamber View (3CH), Also called Left Ventricular Outflow Tract (LVOT)
-
Image of the left atrium, mitral valve, and aortic outflow tract. Also shows portions of the right ventricle and the high ventricular septum. This is the plane for measuring left atrial size, observing LV inflow and outflow, looking for high ventricular septal defects after congential heart disease repair, and evaluating the septum for hypertrophic obstructive cardiomyopathy.
-
Single bright blood cine images in a breath hold
-
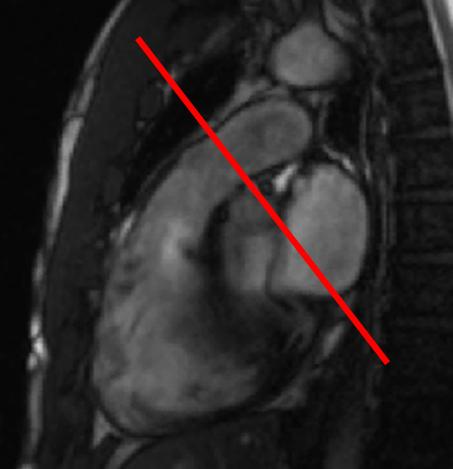
Planned off the short axis stack image where the aorta and LV converge to look like a snowman. This is called the snowman view. The plane slices the snowman in half along its long axis. Check on the VLA that the plane passes through the ventricular apex.
-
Check the plane on the true axial and sagittal scout images to ensure there will be no wrap if parallel imaging is used.


LV = Left Ventricle, LA = Left Atrium, RV = Right Ventricle
-
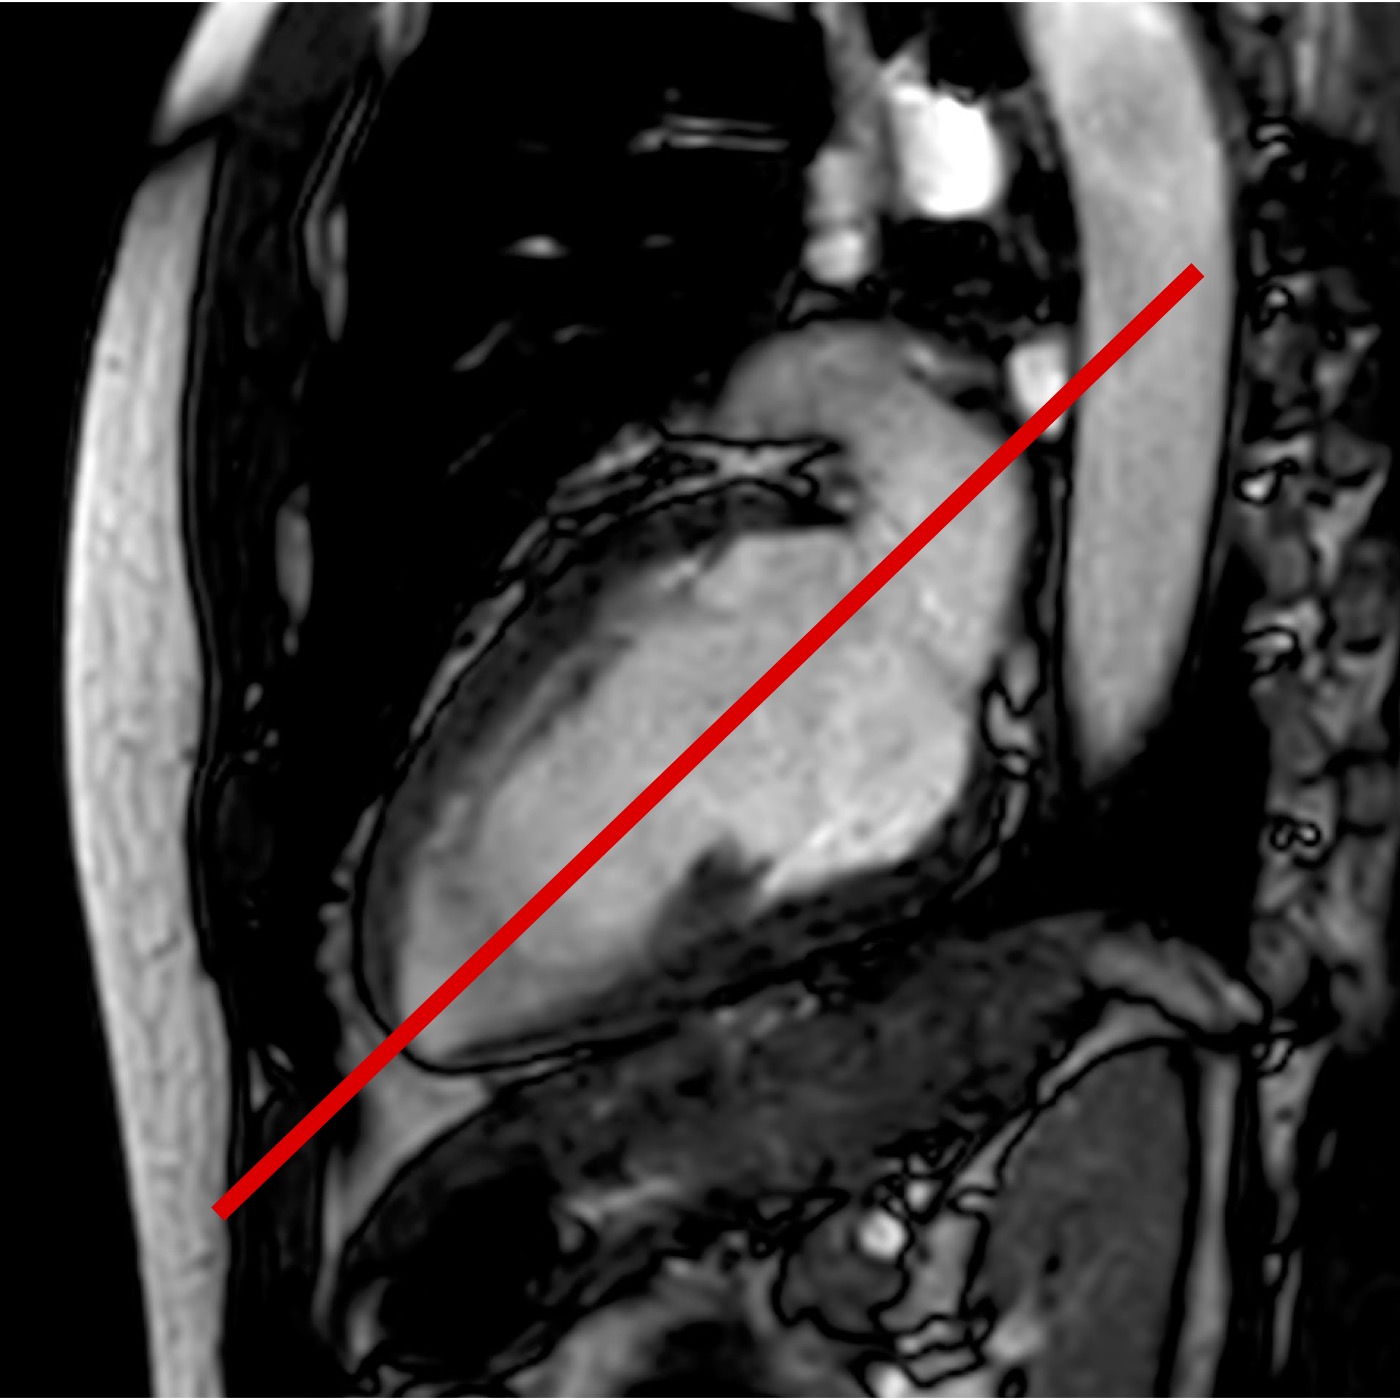
Used to view the aortic root. Important for planning phase contrast and aortic valve images
-
Perscribe a plane that bisects the LVOT into the ascending aorta across the aortic valve.
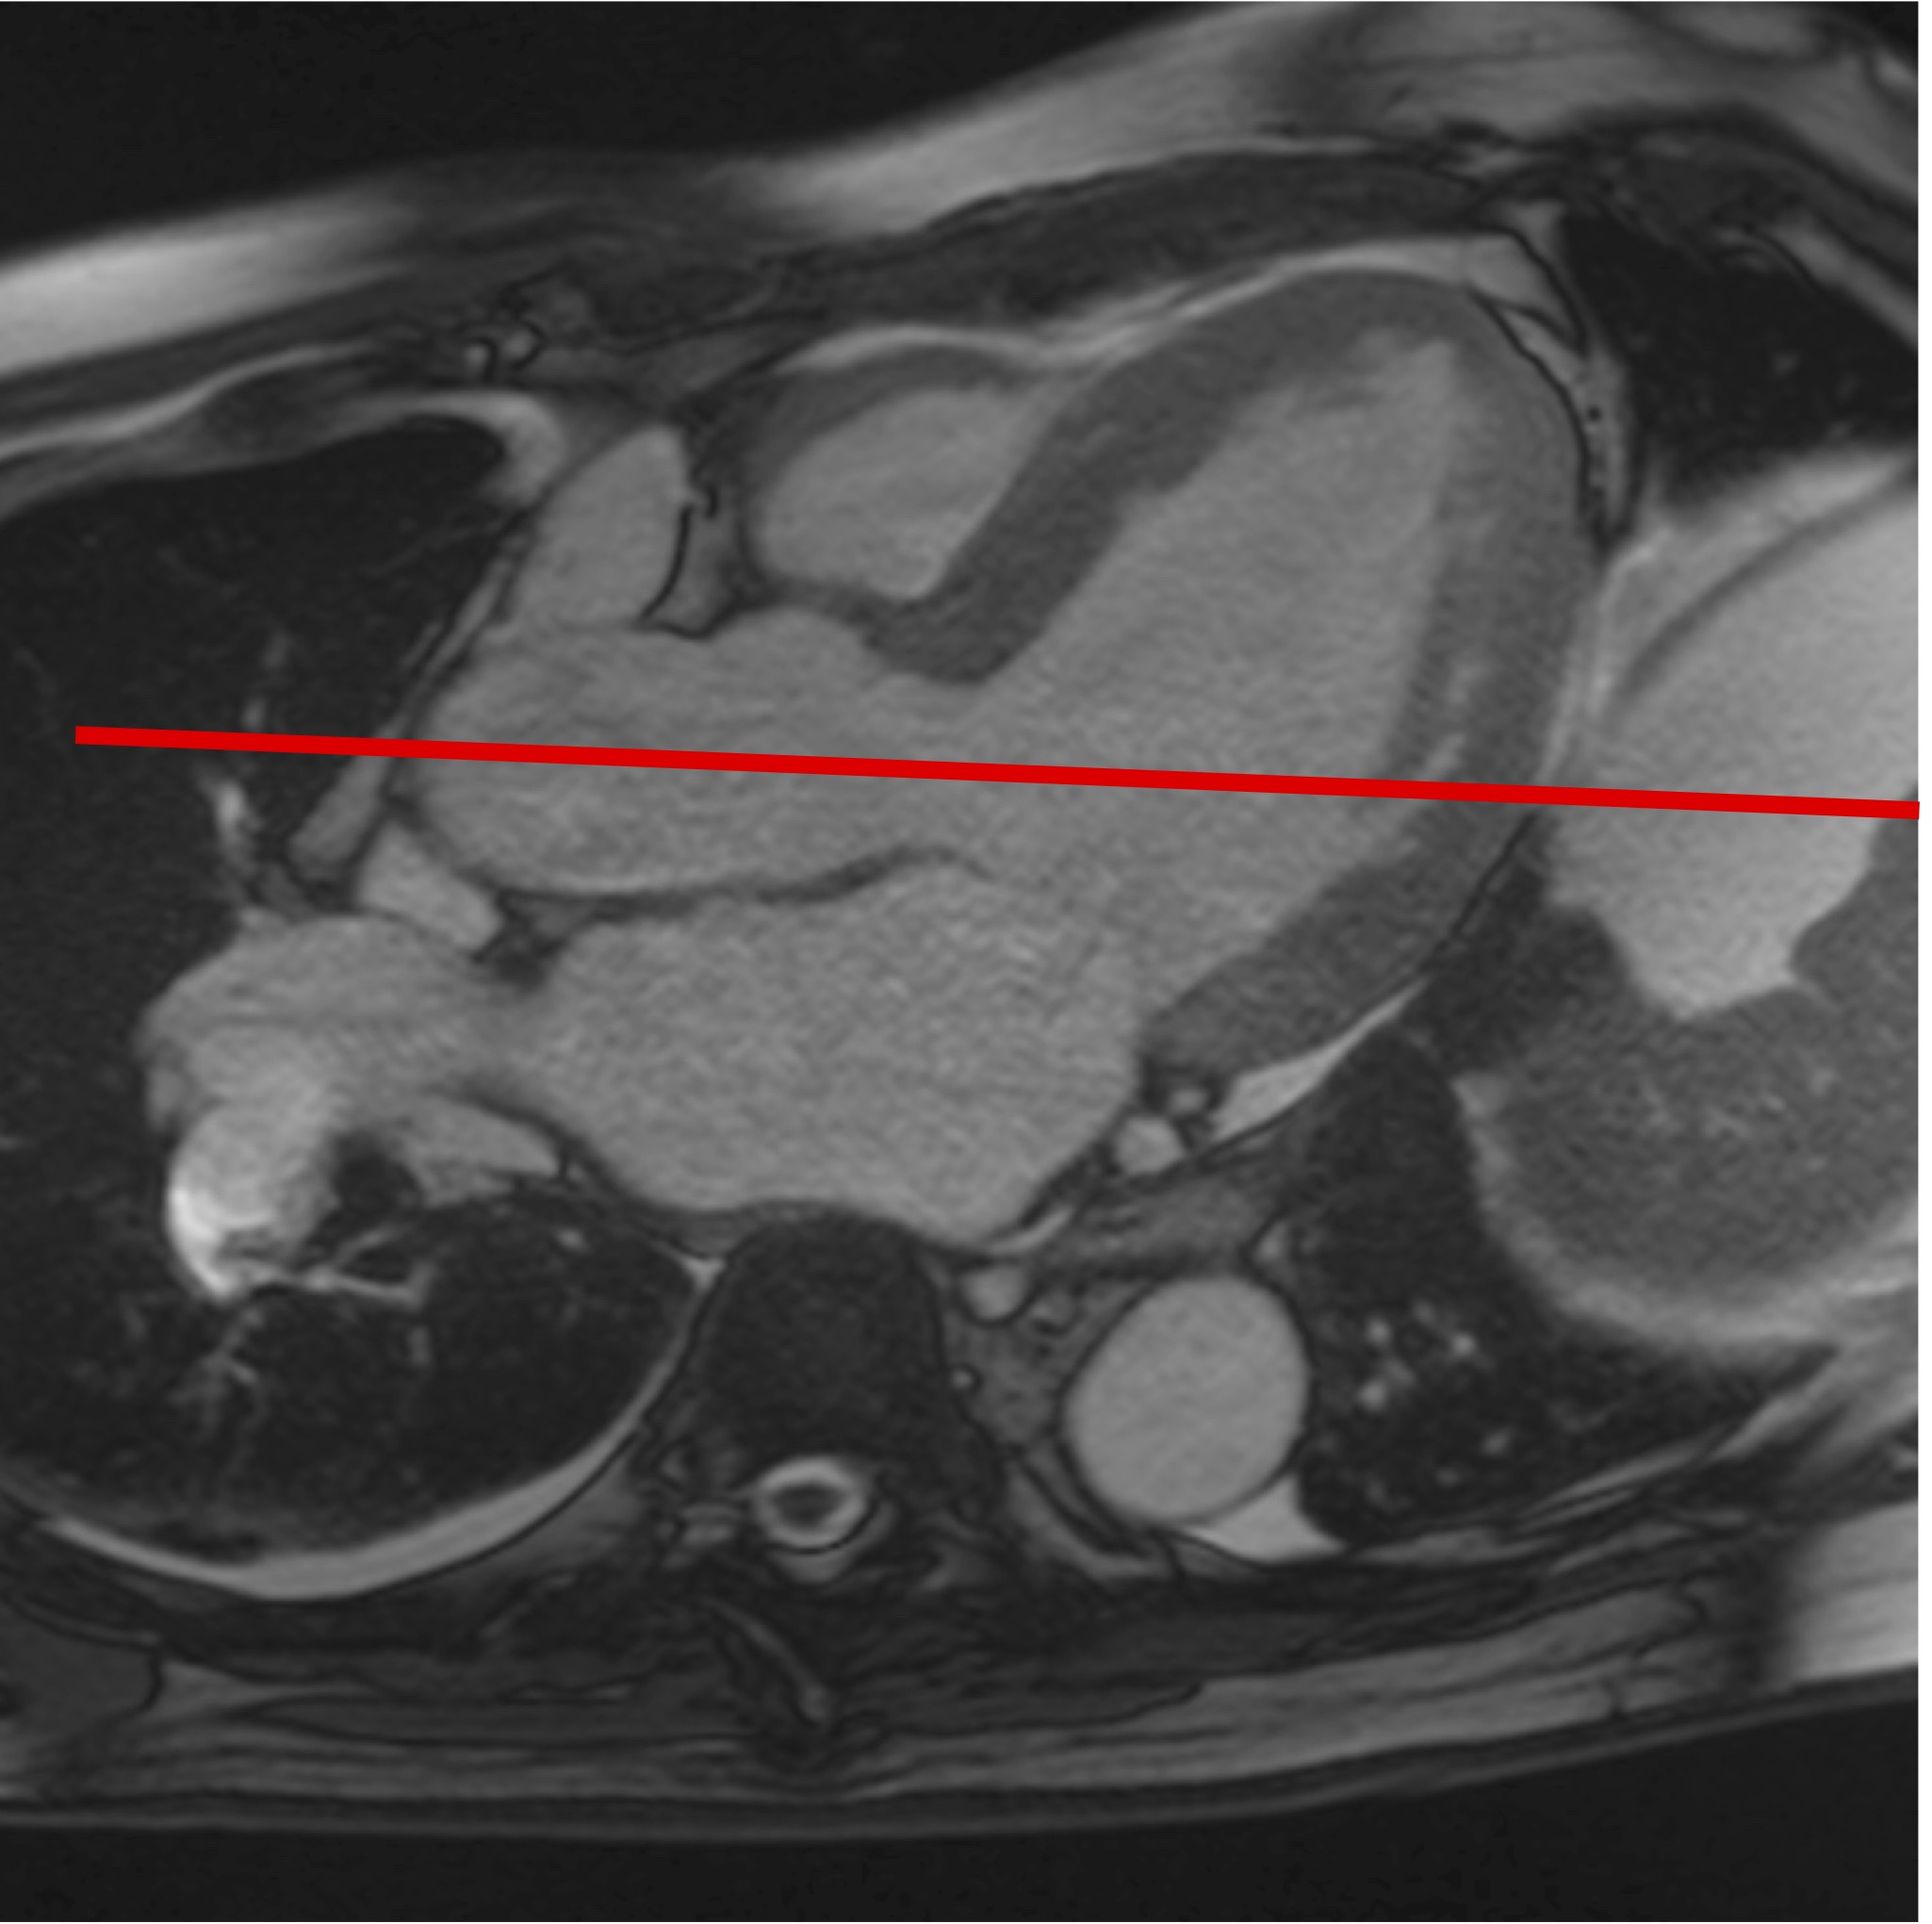

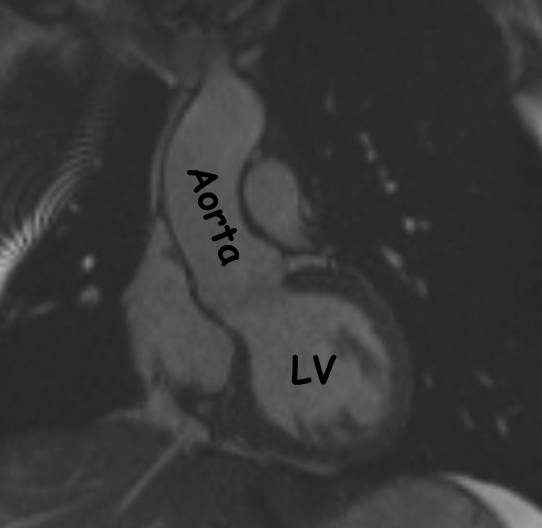
A = Aorta, LV = Left Ventricle, LA = Left Atrium -
Align the 5 slices on the 4CH anfd 2CH views and adjust the slice gap so that the first slice is in the plane of the mitral valve and the last slice is at the apex. Do not change the slice thickness. This is specified separately for each sequence. Remove the 1st and 5th slices by reducing the number of slices from 5 to 3.
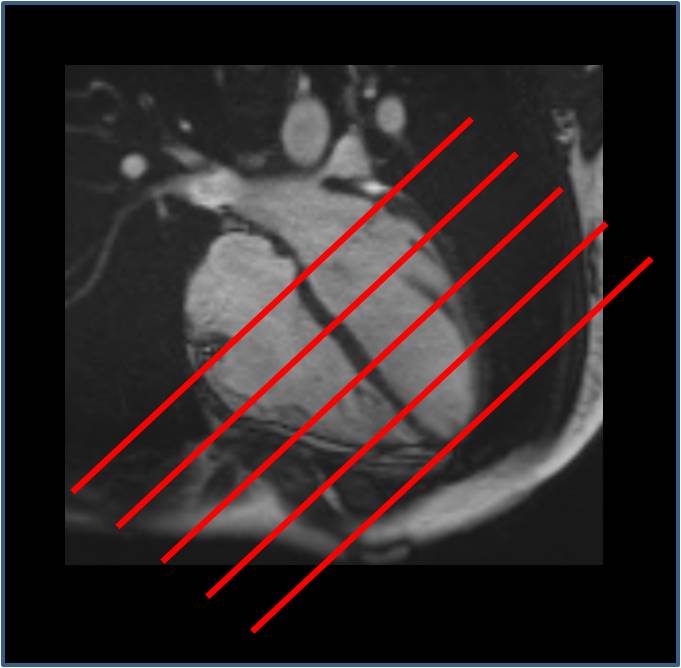
Use these slices for short axis stack T2 FS, T2 mapping, and short axis perfusion. -
Used to measure the forward and backwards flow through the proximal aorta for confirming Simpsons rule measurements of stroke volume, evaluating aortic insufficiency, and measuring volumes of mitral regurgitation.
-
Single phase contrast image obtained with a single breath hold. If the patient cannot breath hold then make free breathing with 3 averages
-
Plan off the LVOT and AORTA cines. Place a plane perpendicular to the aorta above the sinotubular junction. If you are too close to the valve you can get artifacts.
-
Ensure Venc is set to 150 cm/sec
-
Ensure that the sequence is set to measure THROUGH PLANE flow.
-
Check the plane on the true axial and sagittal scout images to ensure there will be acceptable wrap.
-
Here is an alternative way to plan the Aortic Phase Contrast. Plan off the sagittal localizer scout. Find the sag slice where the right PA is seen is a circle. Place an axial plane immediately above the right PA. THIS GETS THE AORTA IN CROSS SECTION (i.e a perfect circle) ALMOST ALL THE TIME. WHEN EVALUATING FOR AORTIC STENOSIS YOU NEED TO USE THE METHOD DESCRIBED ABOVE AND GET CLOSE TO THE VALVE.
-
Used to measure the forward and backwards flow through the pulmonary artery for confirming Simpsons rule measurements of stroke volume, evaluating pulmonic insufficiency, measuring volumes of tricuspid regurgitation, and calculating Qp:Qs for detecting shunt flow.
-
Single phase contrast image obtained with free breathing.
-
Plan off the RVOT and PA cine views. Place the plane perpendicular to the PA on both these images. This gets the PA as circular as possible.
-
Post contrast single slice cine image used to determine the inversion time that should be used in the MDE images below.
-
Single slice EKG gated cine. Can be a long breath hold. Can free breathe if necessary but best not to. Quality is not important on this scout image.
-
Copy the FSA (fake short axis) plane. This is just a scout image and this is faster than copying a single SAS plane.
-
The best TI is the image where the myocardium is darkest.
-
Post contrast images with an inversion pulse set to minimize signal from normal myocardium. Used to detect myocardial fibrosis (infarct or infiltrative disease).
-
2 versions: Single Shot technique is fast and obtains multiple slices in a single breath hold or all slices in a breath hold. FSE obtains one image per breath hold. Both use EKG triggering.
-
Obtained in the same planes as the SAS, 4CH, LVOT, and VLA.
-
When imaging the SAS planes, scan from apex to base so you can stop the scan when you are through the ventricle. If you scan from base to apex the first few slices will be in the atria. These are wasted breath holds.
-
Prior to running you manually set the inversion time (TI) as determined by the TI scout above.
-
Axial Scouts - Dark Blood and Bright Blood
-
VLA cine
-
rVLA cine
-
RVOT cine
-
FSA cine
-
PA Scout cine
-
4CH cine
-
non cine SAS
-
3CH cine
-
Aorta cine
-
Any T1 mapping, T2 mapping
-
Give Contrast
-
-
YOU HAVE 10 MINUTES TO PERFORM THE FOLLOWING
-
Short Axis Stack cine
-
Aorta Phase Contrast
-
Pulmonary Artery Phase Contrast
-
Set up TI scout and LGE images - 2D and 3D
-
-
Run the TI Scout Image (at 10 minutes post contrast)
-
Enter TI into the MDE series and run them
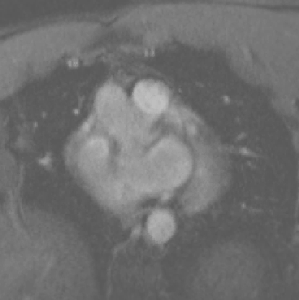
Short Axis for T2 FS, T2 Mapping, T1 Mapping, and Perfusion


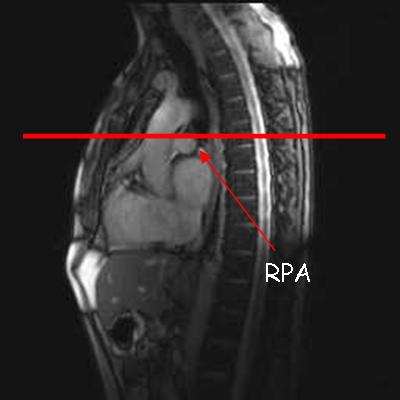
RPA = Right pulmonary artery
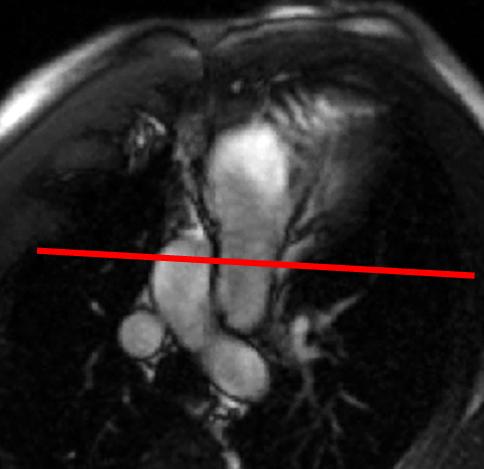
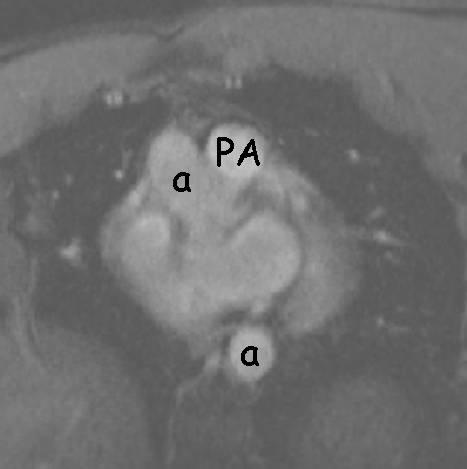
PA = Pulmonary Artery (in cross section), a = aorta

The purpose of this protocol is to evaluate the myocardium for scar which can be secondary to prior infarct, infiltrative disease, myocarditis, or cardiomyopathy.
Breath hold or free breathing?
End expiration breath hold is the most reproducible technique. This is important because you will be making volume measurements off of the images. However, this is the most difficult for the patinet. I find I get the best results with multiple short end expiratory breath holds. I try to keep the breath hold time to less than 8 seconds.
Tips
Use oxygen
Revert to end inspiration if necessary
Have free breathing sequences available to use as a last resort. Free breathing sequences will have decreased resolution and use multiple aveages.